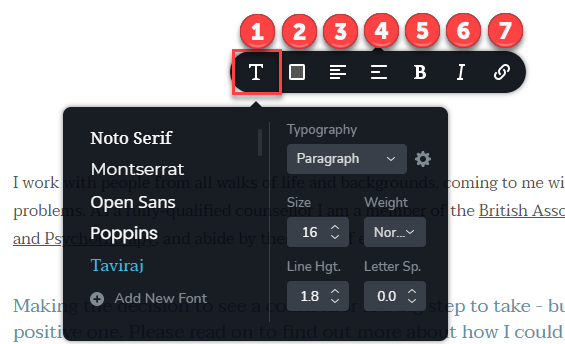
Once you have selected a template and begin adding in your own text, you may want to style it a bit to add colours, change font, add bold text, etc.
This is simple to do:
1. First, if you wish to apply a style to an entire text box, simply click into the text box and the menu bar will appear. The first item on the menu bar is a ‘T’ for ‘Typography’ which allows you to change the type of text, font, size, etc. as seen below.

2. The next menu item is the Colour icon, which is covered in this guide.
3. The third menu item is the Alignment icon, which allows you to left/right/centre align your text.
4. Next we have the List icon, which allows you to create a numbered or bullet-pointed list. Click once for numbers, twice for bullet-points and a third time to remove this feature.
5. We then have ‘B’ for bold…
6. …and ‘I’ for italics. Highlight specific word(s) within your text to apply these styles if you do not wish to apply them to the whole text box.
7. Lastly, we have the Link icon which allows you to add a link to an external website or to another part of your own website, which is explained in this guide.
*NB* – Don’t forget to click ‘Update’ in the bottom right-hand corner after you make any changes to your website so they will be saved!
